
기사 디렉토리
이 튜토리얼에서는 CentOS 7 의 CentOS 웹패널(CWP7)에 Monit 모니터링 시스템을 설치하는 방법을 보여드리겠습니다.
모니터 모니터링이란 무엇입니까?
Monit 모니터링은 무료 오픈 소스 소프트웨어 이며, 매우 유용한 Linux 모니터링 프로그램 입니다 .
- UNIX/Linux에서 서버 프로세스, 파일, 디렉토리, 체크섬 권한, 파일 시스템 및 서비스를 자동으로 모니터링하고 관리할 수 있습니다.
- 예: Apache, Nginx,MySQL의, FTP, SSH, Postfix 등...
- 시스템 관리자에게 탁월한 모니터링 기능을 제공하는 시스템 기반 시스템 관리.
모니터 모니터링을 설치하는 이유는 무엇입니까?
Monit 모니터링을 사용하면 다운타임을 줄일 수 있으며, 이는 전자상거래 웹사이트 의 SEO 및 온라인 마케팅 에 도움이 될 수 있습니다 .
서비스가 다운되면 Monit이 이를 확인하고 서비스를 자동으로 시작하기 때문입니다.
예를 들어 Apache 또는 Nginx 서비스가 아무 이유 없이 다운된 경우 monit이 확인하고 다운된 것으로 확인되면 monit은 관련 서비스를 자동으로 시작합니다.
한 가지 흥미로운 점은 monit이 자체 httpd 서비스를 실행한다는 것입니다.
아파치 서비스가 다운되면 monit은 자체 서비스로 실행됩니다.
CWP 7에서 Monit 모니터링 소프트웨어를 설치 및 설치하는 방법은 무엇입니까?
이 자습서를 완료하려면 다음 전제 조건이 필요합니다.
- CentOS Linux 버전 7(코어)
- CWP7
- CSF 방화벽
1단계: SSH를 통해 YUM 저장소를 업데이트한 다음 Monit 모니터링을 설치합니다. ▼
yum update -y
yum install monit2단계:CSF 방화벽에서 포트 2812 열기 ▼
vi /etc/csf/csf.conf
# Allow incoming TCP ports
 TCP_IN = "20,21,22,2812,25,53,80,110,143,443,465,587,993,995,2030,2031,2082,2083,2086,2087,2095,2096"
3단계: CSF 방화벽 다시 시작▼
csf -r 4단계:SFTP 사용软件Linux 서버 진입 후, Monit 설정 파일 수정/etc/monitrc▼
set daemon  30              # check services at 30 seconds intervals
set log syslog
set pidfile /var/run/monit.pid
set idfile  /var/.monit.id
set statefile /var/.monit.state
include /etc/monit.d/*
set mailserver localhost port 25
set eventqueue
basedir /var/monit  # set the base directory where events will be stored
slots 100           # optionally limit the queue size
set alert admin@xxxxx #receive all alerts
set alert admin@xxxxx not on { instance, action }
set httpd port 2812 and use address 0.0.0.0
allow 0.0.0.0/0.0.0.0
allow admin:monit # require user 'admin' with password 'monit'
5단계: Monit 구문 오류를 확인합니다 ▼
# monit -t
Control file syntax OK
누락된 경우 다음 파일을 만듭니다.
# touch /var/run/monit.pid
# touch /var/log/moinit.log
Redis가 설치되어 있는 경우 , Redis PID 파일의 위치를 수동으로 구성해야 할 수 있습니다. ▼

모니터링 서비스를 추가한 모니터
이제 다음과 같은 일부 서비스를 모니터링합니다.amavisd, clamd, crond, php-fpm 및 cwpsrv.모니터 구성 파일을 엽니다./etc/monitrc, 줄 끝에 다음 코드를 추가합니다.
모니터 CWP.amavisd
# vi /etc/monitrc
check process amavisd with pidfile /var/run/amavisd/amavisd.pid
        start program "/usr/bin/systemctl start amavisd.service"
        stop program "/usr/bin/systemctl stop amavisd.service"
        if failed unixsocket /var/run/amavisd/amavisd.sock then restart
        if cpu > 70% for 4 cycles then alert
        if cpu > 90% for 8 cycles then restart
        if 4 restarts within 8 cycles then timeout
CWP.clamd 모니터링
# vi /etc/monitrc

check process clamd with pidfile /var/run/clamd.amavisd/clamd.pid
        start program "/usr/bin/systemctl start clamd.service"
        stop program "/usr/bin/systemctl stop clamd.service"
        if failed unixsocket /var/run/clamd.amavisd/clamd.sock then restart
        if cpu > 70% for 4 cycles then alert
        if cpu > 90% for 8 cycles then restart
        if 4 restarts within 8 cycles then timeout
모니터 CWP.crond
# vi /etc/monitrc

check process crond with pidfile /var/run/crond.pid
        start program = "/usr/bin/systemctl start crond.service"
        stop  program = "/usr/bin/systemctl stop crond.service"
모니터 CWP.cwp-phpfpm
# vi /etc/monitrc

check process cwp-phpfpm matching "cwp-phpfpm"
        start program "/usr/bin/systemctl start cwp-phpfpm.service"
        stop program "/usr/bin/systemctl stop cwp-phpfpm.service"
        if failed unixsocket /usr/local/cwp/php71/var/sockets/cwpsrv.sock then restart
        if failed unixsocket /usr/local/cwp/php71/var/sockets/cwpsvc.sock then restart
        if failed unixsocket /usr/local/cwp/php71/var/sockets/login.sock then restart
        if cpu > 70% for 4 cycles then alert
        if cpu > 90% for 8 cycles then restart
        if 4 restarts within 8 cycles then timeout
모니터 cwp.cwpsrv
# vi /etc/monitrc

check process cwpsrv with pidfile /usr/local/cwpsrv/var/run/nginx.pid
        start program "/usr/bin/systemctl start cwpsrv.service"
        stop program "/usr/bin/systemctl stop cwpsrv.service"
        if 4 restarts within 8 cycles then timeout
일단 구성되면 monit은 구성 파일을 다시 로드하고 다시 읽어야 하며 웹 인터페이스를 사용할 수 있습니다.
monit reloadMySQL 데이터베이스 프로세스의 PID 파일을 조회하는 방법에 대한 자세한 내용은 아래 튜토리얼을 참조하십시오. ▼

모니터링 서비스다른 방법(권장)
1) 모니터 모니터링 서비스 파일 다운로드▼
- 다운로드 페이지에서 일반 다운로드의 "지금 다운로드" 버튼을 클릭하면 모니터 모니터링 서비스 파일을 무료로 다운로드할 수 있습니다.
- (접속코드: 5588)
2) 압축을 풀고 /etc/monit.d/ 디렉토리에 업로드합니다.
- 있는 경우모니터링 구성 파일 /etc/monitrc에 동일한 구성의 모니터링 서비스가 있습니다.在모니터링 구성 파일 /etc/monitrc가 삭제됩니다. 그렇지 않으면 오류가 발생합니다.
필수 구성 파일 생성 후 구문 오류 테스트▼
monit -t
다음 프롬프트가 나타나면 ▼
monit -t
/etc/monit.d/cwp.mariadbd:1: Service name conflict, mysql already defined '"/usr/sbin/mariadbd"'
- 이것은
/etc/monit.d/cwp.mariadbd:1:서비스 이름 충돌, mysql이 이미 정의됨'"/usr/sbin/mariadbd"' - 여기에 설명이 있습니다
cwp.mariadbd파일이 이미 존재합니다 그냥 삭제하세요cwp.mysqld파일.
오류가 없으면 monit 서비스를 활성화하고 다시 시작합니다 ▼
systemctl enable monit
systemctl restart monit
부팅 시 모니터 서비스 시작 ▼
systemctl enable monit.service
이제 모니터링 로그를 확인하세요 ▼
tail -f /var/log/monit.log모니터링 기본 명령 모니터링
다음 명령으로 monit을 시작합니다 ▼
monit
모니터 상태 확인 ▼
monit status
변경 사항을 적용하려면 새로고침하세요▼
monit reload
모니터가 모니터링하는 모든 프로그램 실행 시작▼
monit start all
모든 Monit 항공 감시 서비스 다시 시작▼
monit restart all
특정 서비스를 시작, 중지 및 다시 시작하려면 다음을 사용할 수 있습니다.monit start name그런 명령 ▼
monit start httpd
monit stop sshd
monit restart nginx
모니터링 개요▼
monit summary
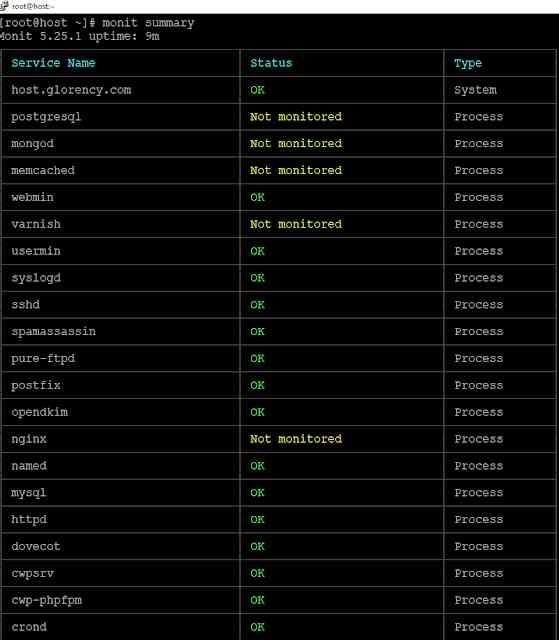
이제 앞에서 설정한 Monit 사용자 이름과 비밀번호를 사용하여 monit 서버에 로그인합니다.
로그인 URL:http://SERVER_FQDN:2812
Monit 서비스가 항상 모니터링되지 않는 문제 해결
Monit에는 전체 또는 특정 서비스의 모니터링을 활성화 및 비활성화하는 명령이 포함되어 있습니다.
Monit 서비스가 항상 모니터링되지 않는 경우 다음 명령을 사용할 수 있습니다▼
monit monitor mysql
또는 모든 모니터링을 다시 활성화▼
monit monitor all
- 이러한 명령이 작동하려면 Monit HTTP 인터페이스를 활성화해야 합니다.
모니터 명령(CentOS 7 전용)
모니터 시작 상태 보기▼
systemctl status monit.service
모니터 서비스 시작▼
systemctl start monit.service
모니터 서비스 닫기▼
systemctl stop monit.service
모니터 서비스 다시 시작▼
systemctl restart monit
부팅 시 모니터 서비스 시작▼
systemctl enable monit.service
모니터 서비스 켜고 끄기▼
systemctl disable monit.service
모니터 노트
Monit는 프로세스 서비스를 모니터링합니다. 즉, Monit에서 모니터링하는 서비스는 정상적인 방법으로 중지할 수 없습니다. 중지되면 Monit에서 다시 시작하기 때문입니다.
Monit에서 모니터링하는 서비스를 중지하려면 다음과 같이 사용해야 합니다.monit stop name이러한 명령, 예를 들어 nginx를 중지하려면 ▼
monit stop nginx
Monit에서 모니터링하는 모든 서비스를 중지하려면 다음 명령을 입력합니다. ▼
monit stop all
모니터 모니터링 프로그램 제거 ▼
yum remove monit
Chen Weiliang님의 블로그( https://www.chenweiliang.com/ ) 에 공유된 "CentOS Webpanel(CWP7)에 Monit 모니터링 소프트웨어를 설치하는 방법"이라는 글이 여러분께 도움이 되기를 바랍니다.
이 기사 링크( https://www.chenweiliang.com/cwl-1443.html )를 자유롭게 공유해 주세요.