ဆောင်းပါးလမ်းညွှန်
စိတ်ကြိုက်မီနူးအင်္ဂါရပ်များနှင့် ဘေးဘားဝစ်ဂျက်များ၊ ဟုတ်ပါသည်။WordPressအပြင်အဆင်ရှိ အထူးအသားပေးအင်္ဂါရပ်များ။
- ဤလုပ်ဆောင်ချက်နှစ်ခုမပါဝင်ပါက ဆောင်ပုဒ်တစ်ခုပြုလုပ်ခြင်းသည် ကြက်နံရိုးနှင့်တူသည်...
Chen Weiliangယခင်၌ဝဘ်ဆိုဒ်တစ်ခုတည်ဆောက်ပါ။ဤသင်ခန်းစာတွင်၊ ကျွန်ုပ်သည် WordPress အပြင်အဆင်ကို မည်သို့ပေးရမည်ကို မျှဝေပါသည်။စိတ်ကြိုက်မီနူးထည့်ပါ။
ဤဆောင်းပါးသည် အပြင်အဆင်တစ်ခုဖန်တီးရာတွင် စိတ်ကြိုက်ဝစ်ဂျက်လုပ်ဆောင်ချက်များကို ထည့်သွင်းနည်းကို ဖော်ပြထားပါသည်။
စိတ်ကြိုက်မီနူးများကို themes များတွင်ထည့်သကဲ့သို့၊ စိတ်ကြိုက်ဝစ်ဂျက်များထည့်ခြင်းမှာ အဆင့် ၃ ဆင့်သာကြာပါသည်။
ပထမအဆင့်၊ gadget မှတ်ပုံတင်ခြင်း။
ဝစ်ဂျက်ကို အသုံးပြုရန်၊ သင်သည် ဦးစွာ မှတ်ပုံတင်ရမည်၊ WordPress ဆောင်ပုဒ်အောက်ရှိ functions.php ဖိုင်ကို ဖွင့်ပါ၊
functions.php ဖိုင်တွင်၊ အောက်ပါကုဒ်ကိုထည့်ပါ။
<?php

//侧边栏小工具
if ( function_exists('register_sidebar') ) {
    register_sidebar( array(
        'name' => __( 'Top Sidebar' ),
        'id' => 'top-sidebar',
        'description' => __( 'The top sidebar' ),
        'before_widget' => '<li>',
        'after_widget' => '</li>',
        'before_title' => '<h2>',
        'after_title' => '</h2>',
    ) );
}

?>
sidebar.php ရှိ တဂ်များနှင့် ကိုက်ညီစေရန် functions.php တွင် li နှင့် h2 တဂ်များကို ပြင်ဆင်ပါ။
'before_widget' နှင့် 'after_widget' တို့၏ li နှင့် module h2 ခေါင်းစဉ်များသည် ပကတိအခြေအနေအရ ကုဒ်ကို ပြင်ဆင်ပါ။
(ပြုပြင်မွမ်းမံခြင်းမရှိဘဲ ဖြစ်နိုင်သည်)
        'before_widget' => '<li>',
        'after_widget' => '</li>',

        'before_title' => '<h2>',
        'after_title' => '</h2>',
အထက်ဖော်ပြပါ ကုဒ်သည် "top-sidebar" အမည်ရှိ ဝစ်ဂျက်ဧရိယာတစ်ခုကို မှတ်ပုံတင်သည်-
- ပြထားသည့်အမည်မှာ "Top Sidebar" ဖြစ်သည်။
- ခေါင်းစဉ်တွင် h2 tag တစ်ခုထည့်ပါ။
- အကြောင်းအရာများကို li ဖြင့် တဂ်ထားသည်။
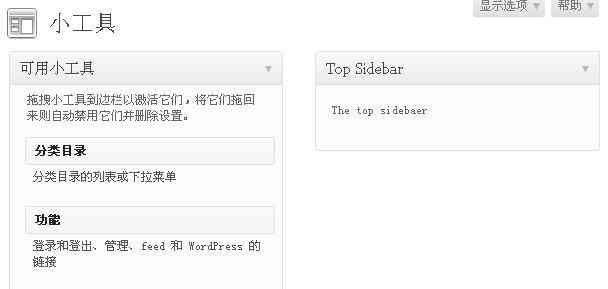
အတွက် LogWordPress နောက်ခံဒက်ရှ်ဘုတ်၊ ပုံပန်းသဏ္ဍာန် → ဝစ်ဂျက်များသို့ သွားပါ။
အောက်ဖော်ပြပါပုံ၏ညာဘက်ခြမ်းရှိ Top Sidebar ဝစ်ဂျက်ဧရိယာကို သင်တွေ့နိုင်လျှင် မှတ်ပုံတင်ခြင်းအောင်မြင်သည်ဟု ဆိုလိုသည် ▼

ဒုတိယအဆင့်၊ gadget ခေါ်ဆိုမှု
gadget ကို စာရင်းသွင်းပြီးနောက်၊ ၎င်းကို theme template ဖိုင်တွင် ခေါ်နိုင်ပြီး အောက်ပါကုဒ်ကို sidebar.php ဖိုင်တွင် ခေါ်နိုင်သည်။
1) အကြီးဆုံး li သို့မဟုတ် div tag အောက်ရှိ sidebar.php ဖိုင်တွင် ▼ ထည့်သွင်းပါ။
<?php if ( !function_exists('dynamic_sidebar') || !dynamic_sidebar(top-sidebar) ) : ?>2) sidebar.php ဖိုင်ထဲမှာ အကြီးဆုံးပါ။သို့မဟုတ်အပေါ်က ▼ ထည့်ပါ။
<?php endif; ?>
အဆင့် XNUMX- ဝစ်ဂျက်များကို စနစ်ထည့်သွင်းပါ။
1) gadget ကို မှတ်ပုံတင်ထားပြီး၊ ပြသမှု အနေအထားကိုလည်း ဆောင်ပုဒ်ဖိုင်တွင် သတ်မှတ်ထားပါသည်။
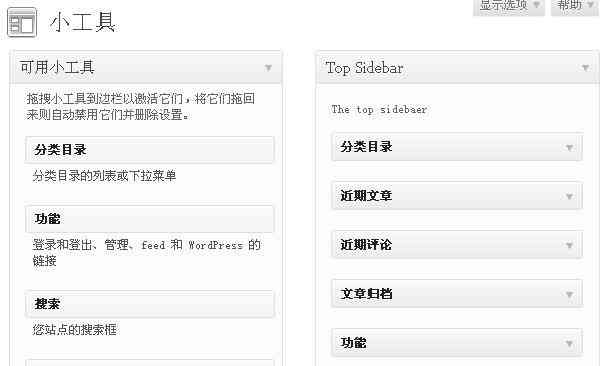
- widget အုပ်စုဧရိယာကို WordPress နောက်ခံ ▼ တွင် သင်သတ်မှတ်နိုင်သည်။

2) သိမ်းဆည်းပြီးနောက် ရှေ့စာမျက်နှာကို ပြန်လည်စတင်ပါ။
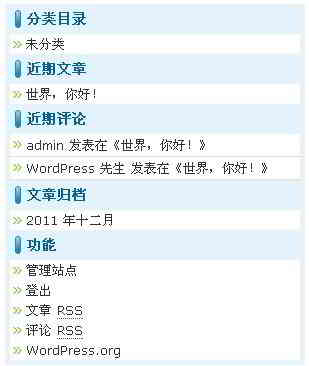
- ကျွန်ုပ်တို့၏ ဝဘ်ဆိုက်၏ ဘေးဘောင်သည် ▼ အောက်ဖော်ပြပါပုံနှင့် တူနေမည်ဖြစ်သည်။

ကျွန်ုပ်တို့၏ gadget ကို ပြုလုပ်ပြီး ပုံမှန်အတိုင်း လုပ်ဆောင်နေကြောင်း ညွှန်ပြနေသော အထက်ဖော်ပြပါပုံကို သင်ကြည့်ရှုနိုင်ပါသည်။
မတူညီသောနေရာများတွင် WordPress ဝစ်ဂျက်များစွာကို မည်သို့ထည့်မည်နည်း။
မတူညီသောနေရာများတွင် သင်၏ WordPress အပြင်အဆင်ကို ပံ့ပိုးပေးသည့် ဝစ်ဂျက်များပြုလုပ်ရန် အဆင့် XNUMX နှင့် XNUMX ကို ပြန်လုပ်ပါ။
ခေါင်းစီး၊ ဘေးဘားနှင့် အပြင်အဆင်၏အောက်ခြေတွင် ဝစ်ဂျက်တစ်ခုထည့်ရမည်ဆိုပါစို့။
1) ပထမဦးစွာ၊ သင်သည် အောက်ပါကုဒ်ကို functions.php ဖိုင် ▼ ထဲသို့ ကူးယူရန် လိုအပ်သည်။
if (function_exists('register_sidebar')) {

register_sidebar(array(
'name' => 'Header',
'id' => 'header',
'description' => 'This is the widgetized header.',
'before_widget' => '<div id="%1$s">',
'after_widget' => '</div>',
'before_title' => '<h4>',
'after_title' => '</h4>'
));
register_sidebar(array(
'name' => 'Sidebar',
'id' => 'sidebar',
'description' => 'This is the widgetized sidebar.',
'before_widget' => '<div id="%1$s">',
'after_widget' => '</div>',
'before_title' => '<h4>',
'after_title' => '</h4>'
));
register_sidebar(array(
'name' => 'Footer',
'id' => 'footer',
'description' => 'This is the widgetized footer.',
'before_widget' => '<div id="%1$s">',
'after_widget' => '</div>',
'before_title' => '<h4>',
'after_title' => '</h4>'
));

}
2) ထို့နောက်၊ header.php၊ sidebar.php နှင့် footer.php ဖိုင်များသို့ အောက်ပါကုဒ်များကို ထည့်ပါ။
header.php ▼
<div id="widgetized-header">

<?php if (function_exists('dynamic_sidebar') && dynamic_sidebar('header')) : else : ?>

<div>
<p><strong>Widgetized Header</strong></p>
<p>This panel is active and ready for you to add some widgets via the WP Admin</p>
</div>

<?php endif; ?>

</div>
sidebar.php ▼
<div id="widgetized-sidebar">

<?php if (function_exists('dynamic_sidebar') && dynamic_sidebar('sidebar')) : else : ?>

<div>
<p><strong>Widgetized Sidebar</strong></p>
<p>This panel is active and ready for you to add some widgets via the WP Admin</p>
</div>

<?php endif; ?>

</div>
footer.php ▼
<div id="widgetized-footer">

<?php if (function_exists('dynamic_sidebar') && dynamic_sidebar('footer')) : else : ?>

<div>
<p><strong>Widgetized Footer</strong></p>
<p>This panel is active and ready for you to add some widgets via the WP Admin</p>
</div>

<?php endif; ?>

</div>
ဒါက အောင်မြင်မှုတစ်ခုပါ။
- ဟုတ်ပါတယ်၊ သင်သည် သင့်လိုအပ်ချက်အရ ကုဒ်ရှိ အသေးစိတ်အချက်အလက်များကို အမျိုးမျိုးပြောင်းလဲနိုင်သည်။ ^_^
- အထက်ဖော်ပြပါ အဆင့် ၂ ဆင့်၊ ကျန်ရှိသော အပြင်အဆင်ကို ဝစ်ဂျက်၏ လုပ်ဆောင်နိုင်စွမ်းကို ပေါင်းစပ်ခွင့်ပြုပါ။
ထို့နောက် WordPress တွင် ဝစ်ဂျက်များအသုံးပြုခြင်းအတွက် အကြံပြုချက်များကို ဆက်လက်မျှဝေပါ။
WordPress Theme ပေါင်းစပ်မှု ဝစ်ဂျက် ဝစ်ဂျက် အကြံပြုချက်များ
စိတ်ကြိုက်ဝစ်ဂျက်များကို ထိရောက်စွာ စီမံခန့်ခွဲပါ-
1) theme တွင် widget များထည့်ပြီးနောက်၊ သင်သည် သီးခြားဖိုင်တစ်ခုဖန်တီးပြီး ၎င်းကို အမည်ပေးနိုင်ပါသည်။widgets.php။
- အဆင့် 1 တွင် ထည့်သွင်းထားသော စိတ်ကြိုက်ဝစ်ဂျက်ကုဒ်အားလုံးကို ဤဖိုင်တွဲတွင် သိမ်းဆည်းရန်။
2) functions.php ဖိုင်တွင် ကုဒ်ကို ထည့်ပါ။
if ($wp_version >= 2.8) require_once(TEMPLATEPATH.’/widgets.php’);
3) အဆင့် 1 တွင် ထည့်သွင်းထားသော စိတ်ကြိုက်ဝစ်ဂျက်များ ဝစ်ဂျက်ကုဒ်အားလုံးကို widgets.php ဖိုင်သို့ သိမ်းဆည်းပါ။
ဤနည်းလမ်းသည် ဝစ်ဂျက်များအားလုံးကို ချောမွေ့စွာတင်နိုင်ပြီး ဝစ်ဂျက်များကို ပံ့ပိုးသည့် WordPress ဗားရှင်းအားလုံးတွင် အလုပ်လုပ်ကြောင်း သေချာစေသည်။
ဤနည်းအားဖြင့်၊ သင်သည် သင်၏ WordPress အပြင်အဆင်ဖိုင်များကို ပိုမိုထိရောက်စွာ စီမံခန့်ခွဲနိုင်သည်။
မျှော်လင့်ခြင်း Chen Weiliang ဘလော့ဂ် ( https://www.chenweiliang.com/ ) shared " WordPress Widgets ထည့်နည်း။Theme Integration Widgets Area" သည် သင့်အား ကူညီပေးပါမည်။
ဤဆောင်းပါး၏ link ကိုမျှဝေရန်ကြိုဆိုပါတယ်:https://www.chenweiliang.com/cwl-1476.html
နောက်ထပ်လျှို့ဝှက်လှည့်ကွက်များကိုသော့ဖွင့်ရန်🔑၊ ကျွန်ုပ်တို့၏ Telegram ချန်နယ်တွင် ပါဝင်ရန် ကြိုဆိုလိုက်ပါ။
ကြိုက်ရင် Share ပြီး Like လုပ်ပါ။ သင်၏ မျှဝေမှုများနှင့် ကြိုက်နှစ်သက်မှုများသည် ကျွန်ုပ်တို့၏ ဆက်လက်လှုံ့ဆော်မှုဖြစ်သည်။
