
Каталог статей
Раніше в блозі Чень Вейлян поділився навчальним посібником зі встановлення та налаштування Monit на CentOS 6. ▼

Однак налаштування програми моніторингу Monit у CentOS 7 дещо відрізняється від CentOS 6; воно не зовсім те саме.
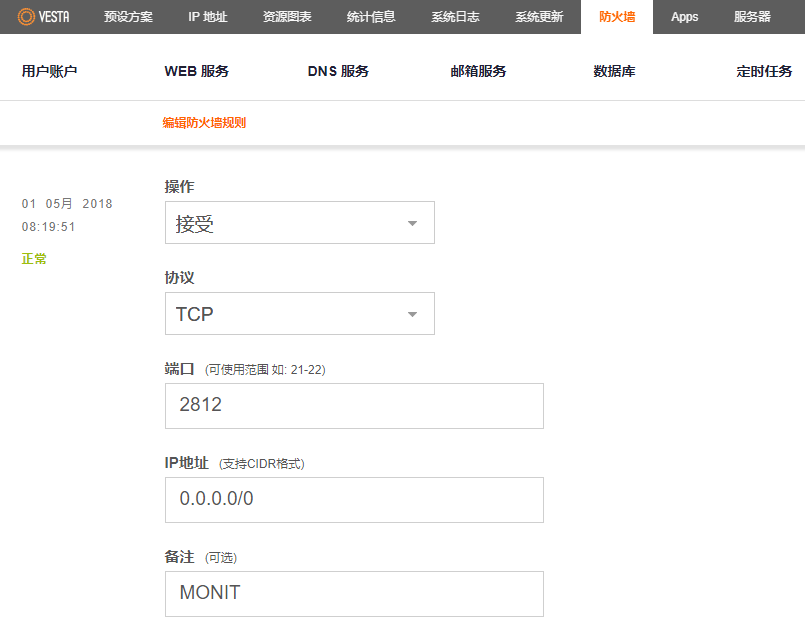
Якщо ваш хостинг Linux працює на CentOS 7, і ви встановили Monit на панелі Vesta CP, ви можете виконати налаштування програми моніторингу Monit за допомогою цього посібника.
Сервіс моніторингу процесу моніторингу
Нижче наведено вміст конфігурації служби процесу моніторингу Monit (видалення деяких служб моніторингу, які рідше використовуються):
Конфігурація моніторингу Monit
Імена конфігураційних файлів Monit відрізняються для CentOS 6 і 7:
- Назва конфігураційного файлу Monit для CentOS 6 — "monit.conf"
- Назва конфігураційного файлу Monit для CentOS 7 — "monitrc"
Після доступу до вашого Linux-сервера за допомогою програмного забезпечення SFTP , відредагуйте файл конфігурації Monit ▼
/etc/monitrc
Додайте наступний вміст конфігурації до цього файлу "monitrc" ▼
##
## 陈沩亮博客示例monit配置文件说明:
## 1. 域名以 www.etufo.org 为例。
## 2. 后面带xxx的均是举例用的名字,需要根据自己的需要修改。
##
################################################## #############################
## Monit control file
################################################## #############################
#
# 检查周期,默认为2分钟,对于网站来说有点长,可以根据需要自行调节,这改成30秒。
set daemon 30

include /etc/monit.d/*

# 日志文件
set logfile /var/log/monit.log

#
# 邮件通知服务器
#
#set mailserver mail.example.com
set mailserver localhost with timeout 30 seconds

#
# 通知邮件的格式设置,下面是默认格式供参考
#
## Monit by default uses the following alert mail format:
##
## --8<--
## From: monit@$HOST # sender
## Subject: monit alert -- $EVENT $SERVICE # subject
##
## $EVENT Service $SERVICE #
## #
## Date: $DATE #
## Action: $ACTION #
## Host: $HOST # body
## Description: $DESCRIPTION #
## #
## Your faithful employee, #
## monit #
## --8<--
##
## You can override the alert message format or its parts such as subject
## or sender using the MAIL-FORMAT statement. Macros such as $DATE, etc.
## are expanded on runtime. For example to override the sender:
#
# 简单的,这只改了一下发送人,有需要可以自己修改其它内容。
set mail-format { from: admin@xxxx }

# 设置邮件通知接收者。建议发到gmail,方便邮件过滤。
set alert xxx@xxxx

set httpd port 2812 and #设置http监控页面的端口
use address www.etufo.org # http监控页面的IP或域名
##allow localhost # 允许本地访问
##allow 203.82.90.239 # 允许指定IP访问
allow user:password # 访问用户名密码

################################################## #############################
## Services
################################################## #############################
#
# 系统整体运行状况监控,默认的就可以,可以自己去微调
#
# 系统名称,可以是IP或域名
#check system www.etufo.org
# if loadavg (1min) > 4 then alert
# if loadavg (5min) > 2 then alert
# if memory usage > 75% then alert
# if cpu usage (user) > 70% then alert
# if cpu usage (system) > 30% then alert
# if cpu usage (wait) > 20% then alert


# 可选的ssl端口的监控,如果有的话
# if failed port 443 type tcpssl protocol http
# with timeout 15 seconds
# then restart

# 监控mariadb
check process mysql with pidfile /var/run/mariadb/mariadb.pid
start program = "/usr/bin/systemctl start mariadb"
stop program = "/usr/bin/systemctl stop mariadb"
if failed host 127.0.0.1 port 3306 for 2 cycles then restart
if 2 restarts within 4 cycles then timeout

# 监控httpd
check process httpd with pidfile /var/run/httpd/httpd.pid
    start program = "/usr/bin/systemctl start httpd"
    stop program = "/usr/bin/systemctl stop httpd"
#    if children > 120 for 2 cycles then restart
#    if failed host localhost port 8080 protocol http for 2 cycles then restart
#    if 4 restarts within 10 cycles then timeout

# 监控nginx
check process nginx with pidfile /var/run/nginx.pid
    start program = "/usr/bin/systemctl start nginx"
    stop program = "/usr/bin/systemctl stop nginx"
#    if failed host localhost port 443 protocol http for 2 cycles then restart
#    if 4 restarts within 10 cycles then timeout

# 监控sshd
check process sshd with pidfile /var/run/sshd.pid
start program = "/usr/bin/systemctl start sshd"
stop program = "/usr/bin/systemctl stop sshd"
if failed host localhost port 22 protocol ssh for 2 cycles then restart
if 4 restarts within 10 cycles then timeout

# 监控vesta-nginx
check process vesta-nginx with pidfile /var/run/vesta-nginx.pid
start program = "/usr/bin/systemctl start vesta"
stop program = "/usr/bin/systemctl stop vesta"
if failed host localhost port 8083 protocol https for 2 cycles then restart
if 4 restarts within 10 cycles then timeout

# 监控vesta-php
check process vesta-php with pidfile /var/run/vesta-php.pid
start program = "/usr/bin/systemctl start vesta"
stop program = "/usr/bin/systemctl stop vesta"
if failed host localhost port 8083 protocol https for 2 cycles then restart
if 4 restarts within 10 cycles then timeout

# 监控vsftpd
check process vsftpd with match vsftpd
start program = "/usr/bin/systemctl start vsftpd"
stop program = "/usr/bin/systemctl stop vsftpd"
if failed host localhost port 21 protocol ftp for 2 cycles then restart
if 4 restarts within 10 cycles then timeout

#监控crond
check process crond with pidfile /var/run/crond.pid
start program = "/usr/bin/systemctl start crond"
stop program = "/usr/bin/systemctl stop crond"
if 5 restarts within 5 cycles then timeout

#监控dovecot
check process dovecot with pidfile /var/run/dovecot/master.pid
start program = "/usr/bin/systemctl start dovecot"
stop program = "/usr/bin/systemctl stop dovecot"
if failed host localhost port 143 protocol imap for 2 cycles then restart
if 4 restarts within 10 cycles then timeout

#监控exim
check process exim with pidfile /var/run/exim.pid
start program "/usr/bin/systemctl start exim"
stop program "/usr/bin/systemctl stop exim"
if failed host localhost port 25 protocol smtp for 2 cycles then restart
if 4 restarts within 10 cycles then timeout
Якщо ви змінили вміст конфігурації MONIT, вам потрібно перезапустити службу Monit, щоб вона набула чинності▼
systemctl restart monit
Оновлення 2018/5/26:
- Рекомендовано використовувати наведений вище вміст конфігурації ▲
- Наступні команди SSH не рекомендуються для створення файлів для служби моніторингу Monit.
cd /etc/monit.d/
git clone https://github.com/infinitnet/vesta-centos7-monit.git ./ && rm -f README.md
myip=1.2.3.4
sed -i 's/host localhost/host '$myip'/g' /etc/monit.d/*.conf
systemctl restart monit- Замініть своєю спільною IP-адресою1.2.3.4.
Не вдалося знайти команду git bash, оскільки може статися помилка ▼
Також може здатися, що після введення цієї команди ▼
sed -i 's/host localhost/host '$myip'/g' /etc/monit.d/*.conf
З’являється таке повідомлення про помилку ▼
sed: can't read /etc/monit.d/*.conf: No such file or directory
Помилка перегляду журналу моніторингу
Команда файлу журналу перегляду SSH monit.log▼
tailf /var/log/monit.log
- SSH для перегляду файлу monit.log можна відобразити лише останні 10 рядків журналів.
Рекомендується вхід через SFTP /var/log/monit.log щоб повністю переглянути стан попереднього файлу журналу monit.log.
Помилка надсилання електронної пошти
Якщо пошту Monit неможливо надіслати, з’явиться таке повідомлення про помилку ▼
error : Cannot open a connection to the mailserver localhost:25 -- Operation now in progress
error : Mail: Delivery failed -- no mail server is available
Виправте помилки надсилання електронної пошти
Чень Вейлян рекомендує використовувати Gmail SMTP ▼
set mailserver smtp.gmail.com port 587
username "[email protected]"
password "password"
using tlsv1
with timeout 30 seconds
Рішення полягає в тому, щоб замінити встановлений поштовий сервер у файлі конфігурації Monit, будь ласка, перегляньте цей посібник для деталей ▼
статистична помилка файлової системи
Якщо ви знайдете такі помилки у файлі журналу monit.log ▼
filesystem statistic error: cannot read /proc/diskstats -- No such file or directory
- Ймовірно, тому що Linux за замовчуванням передбачає мінімальну інсталяцію VestaCPпанелі, не існує
/proc/diskstatsФайл моніторингу стану диска.
усунення статистичних помилок файлової системи
крок 1:SSH в /etc/monit.d каталог ▼
cd /etc/monit.d
Крок 2: Видаліть файл служби моніторингу Monit «root-space.conf» ▼
rm -rf root-space.conf
Крок 3: Перезапустіть моніторинг Monit через SSH ▼
systemctl restart monit.service
Команда Monit (спеціально для CentOS 7)
Переглянути стан запуску Monit ▼
systemctl status monit.service
Запустіть службу Monit ▼
systemctl start monit.service
Закрийте службу Monit▼
systemctl stop monit.service
Перезапустіть службу Monit ▼
systemctl restart monit
Запустіть службу Monit під час завантаження ▼
systemctl enable monit.service
Увімкніть і вимкніть службу Monit ▼
systemctl disable monit.service
Сподіваюся, стаття «Як налаштувати процес Monit у панелі Vesta CP у CentOS 7?», опублікована в блозі Ченя Вейляна ( https://www.chenweiliang.com/ ), буде вам корисною.
Не соромтеся поділитися посиланням на цю статтю: https://www.chenweiliang.com/cwl-730.html